Overwatering, poorly draining soils, and a lack of oxygen around the roots are the causes of orchid death. The top inch of the growing medium must dry out between waterings for orchids. Orchids that have constantly wet soil get root rot, and their leaves turn yellow and wither away.
In addition to bright, indirect light, a temperature range of between 55°F (12°C) and 75°F (23°C), relatively humid conditions away from draughts, and only watering when the top inch of the potting medium is dry, but the rest of the medium should not completely dry out, orchids are epiphytes that require more oxygen around their roots than most plants.
When orchids are planted in potting soil that retains too much moisture, the roots rot and the leaves become yellow and wither, which is a common cause of orchid death.
Instead than using moss or regular potting soil, orchids should only be potted in pine bark or specific orchid potting mixtures.
By simulating some of the conditions in their native environment and by pruning dying roots, it is crucial to create the ideal conditions for orchids in order to revive them.
| Causes of Orchid Death | Symptoms: |
| excessive watering, excessively damp soil, and poorly drained pots. | yellowing and drooping leaves and stems. Roots frequently become mushy, dark, and black and emit a foul odor. |
| Sunburn (orchids require indirect light not full sun) | burned leaves that eventually fall off are yellow or brown. |
| failing to water frequently enough or watering too little. | Orchid leaves that are wrinkled and drooping. When there is severe dehydration, leaves turn yellow. The roots become papery, thin, and white. |
| Roots can become burned by fertilizer overuse. Special fertilizer made for orchids is necessary. The typical fertilizer is excessively potent. | Leaves can become floppy and occasionally become yellow, while roots can turn brown or black. The flowering of orchids might be hampered by excessive fertilizer. |
| The orchid is under stress for a number of reasons, including extreme cold or heat, and low humidity. Both bright sun and low light can cause the buds to fall off and the orchid to perish. | Dropping buds, fading leaves that are yellow or brown, and root regrowth. |
To find out why your orchid is dying and how to save it, keep reading.
Table of Contents
Orchid Leaves and Stems Wilting, Turning Yellow (Overwatering)
- Symptoms. The orchid’s leaves and stems are looking wilted, turning yellow, and withering away. Roots may first appear yellow, brown, or black, have a mushy feel, and have a foul smell. Eventually, they turn papery-gray.
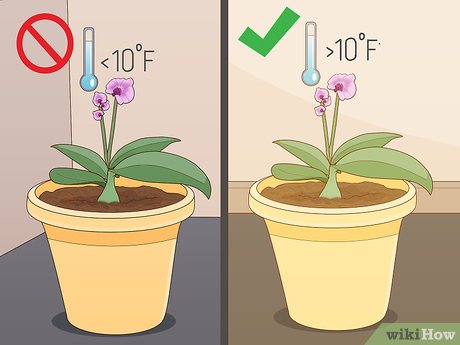
- Causes. When growing orchids, overhead irrigation, excessive watering, potting soil that retains too much moisture, or soil that is overly compacted can all lead to stem rot or root rot (orchids require aerated soil). Orchids also turn yellow in temperatures below 55°F (12°C).
The majority of orchid species used as houseplants are either epiphytes (which means they are specially adapted to growing on trees and the roots absorb water vapor from the air around them instead of uptaking water from soil) or they grow in loose, gravelly aggregate on the ground with extremely quick drainage, ensuring that their roots are not sat in standing water or even damp soil.
In order to effectively grow orchids, it is crucial to mimic some of the circumstances of their native habitat, with a focus on good drainage, proper watering, and strong, indirect light levels. This will help to prevent your orchid from becoming yellow, drooping, and dying.
Overwatering and poorly draining soils are the causes of orchids becoming yellow. Between watering sessions, the soil must dry out for orchids. If the soil is consistently wet, the orchid’s leaves and stems wilt, droop, and eventually die.
Yellow orchid leaves signify that the roots are unable to effectively transfer water or nutrients around the orchid due to root rot or an excess of soil moisture that has obliterated the oxygen needed for root respiration.
Overwatered orchid roots can have a mushy texture, a terrible odor, and an appearance of yellow, brown, or even black. The roots eventually turn gray, papery, and die back from root rot. Healthy orchid roots, on the other hand, are firm and green or light gray in color.
In order to meet their watering needs and prevent root rot, orchids should typically be watered once every seven days or so in the spring and summer and once every ten to fourteen days in the fall and winter.
(Read my post to find out how frequently to water orchids in various regions and seasons.)
Planting orchids in the proper pine bark potting medium is crucial to preventing yellow orchid leaves because regular potting soil or even peat moss retains too much moisture for orchids to handle and doesn’t have the aerated, porous structure necessary for oxygen to reach the roots and allow orchids to breathe and function normally.
Therefore, even if you water your orchids infrequently, their leaves and stems may still turn yellow if the soil in which they are grown is excessively damp or has too small of soil particles, which results in a deficiency of oxygen near the roots.
It’s also important to keep in mind that orchids should preferably be repotted with fresh potting soil every two to three years.
This is so that orchid roots can breathe effectively, which requires a lot of oxygen around the roots.
The size of the pores and the amount of air surrounding the roots reduces when the potting medium decomposes (becomes like compost after about two years), suffocating the roots and causing the orchid to turn yellow and die back.
The risk of root rot and other fungi that cause the leaves of orchids to turn yellow increases if orchids are grown in pots without drainage holes in the base or because saucers and trays placed underneath the pots allow water to collect around the bottom of the pot and cause consistently damp pitting mix around the roots.
Orchids require excellent drainage, so always put them in containers with holes in the bottom that permit water to drain easily after watering.
(For more advice, read my post on picking the best pots for growing orchids.)
It should be emphasized that even if an orchid has yellow leaves and some of the roots look like they’re decaying, it can still survive if there are at least a few healthy roots.
The Yellow Leaves and Stems of Crown Rot
It is also important to remember that watering orchids at soil level (or in a basin) is preferable to watering them from above onto their leaves and stems.
The funnel-like shape of orchid leaves can allow water to collect on the plant’s crown rather than drain down into the soil, which can lead to crown rot from stagnant water.
The orchid may have crown rot, which can cause the leaves and stem to first turn yellow before eventually turning brown or black and causing the orchid to wither away.
How to Revive Orchids With Wilting, Yellow Leaves and Stems from Overwatering
- Reduce the amount of time you water the orchid and let the soil dry out as the initial stage. The top inch or so of the potting medium should always feel dry before watering again. However, this can vary depending on your climate, the type of potting medium, and the size of the pot. (For further information, see my post on watering orchids.)
- Make careful to put your orchid in a potting mixture designed exclusively for growing orchids. Because of its aerated structure and good drainage, which mimic the soil conditions of the orchids’ natural environment, pine bark-based mixes perform well. You should repot your orchid to a special orchid potting mix of pine bark (rather than moss) in order to prevent root rot. If your orchid is planted in regular potting soil or moss, it retains too much moisture around the roots, which interferes with the orchid’s ability to absorb nutrients and water, causing the leaves to turn yellow and the plant to die back.
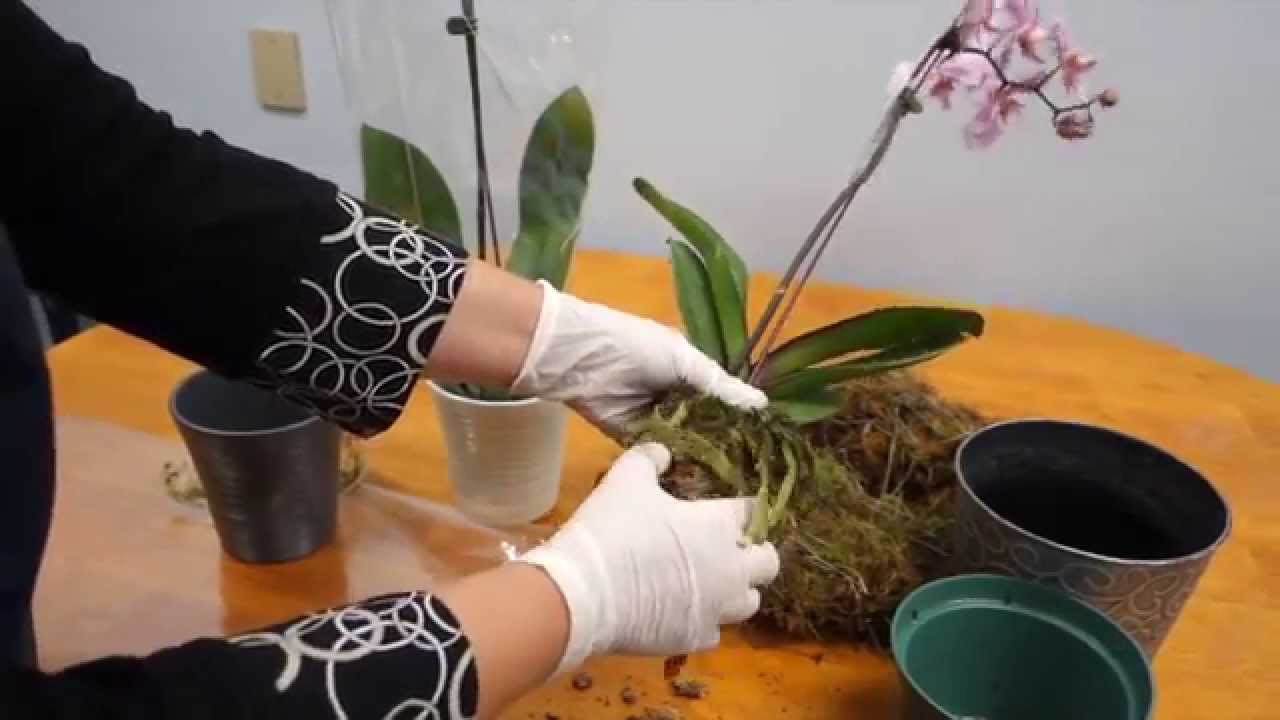
- Examine the roots for illness indications. Depending on how recently they have had water, healthy orchid roots often range in color from green to light gray and feel solid and plump. Cut down the unhealthy roots if your orchids’ roots are mushy, brown, or black, frequently with a foul smell, as this may be a sign of disease or stress due to a lack of oxygen.
- Any roots that are unhealthy or infected should be cut back to promote healthy growth. Any roots that appear brown, black, or mushy should be pruned down using sterile pruners or scissors because they can no longer transfer water or nutrients and could severely harm your orchid if left in place. Use alcohol gel or a disinfectant to wipe the pruner blades between each cut to avoid the possibility of spreading fungi to otherwise healthy tissue. If required, completely remove diseased roots from the plant and cut them back to healthy growth.
- The orchid can still be revived if there are still some strong, active, green (or light grey) roots. Although cutting off the sick or decaying roots may sound severe, orchids are more resilient than their reputation would suggest when it comes to surviving and coming back.
- Cut the stems back to healthy growth if they are yellow, even if that means cutting the stem all the way to the orchid’s base. This aids in stopping the spread of disease, and if the stem turns yellow, it stops working. Reduction in growth encourages the development of new stems.
- Yellow leaves frequently wither away, but if any of them are still firmly attached, do not pull them off. Although forcing the leaves off the orchid could harm it, they will eventually turn brown and fall off before any new leaves can form.
- Replant your orchid in new potting soil that is appropriate for it, such as pine bark or a mix designed specifically for orchids. For your orchid to recover, pine bark potting media have the ideal aerated structure, which supports root respiration and good drainage. Use fresh potting soil; old potting soil may contain pathogens that cause diseases caused by fungi.
- After repotting, give the orchid a good soak to lessen transplant shock and maintain it in bright indirect sun for a few days, preferably in conditions that are neither too hot or too cold. After the roots are removed, the orchid may experience some shock, therefore it’s crucial to avoid overstressing it. The demand for moisture in orchids is increased by high temperatures and direct sunlight at a time when the number of roots that take in moisture has been lowered to assist the plant survive.
- Keep the orchid in indirect light, between 55 and 75 degrees Fahrenheit (12 and 23 degrees Celsius) at night, and water it well every seven days or so until the top inch of the potting medium becomes dry.
- Every two or three days, mist the leaves with water to maintain a humid microclimate that resembles the humidity of the orchids’ natural habitat. Additionally, this aids in lowering transpiration—the loss of water from the leaves—which is crucial for reviving the orchid as it develops new roots.
There is a chance the orchid can be preserved as long as there are some healthy green (or light grey) roots that feel solid and plump.
In contrast to other plants, orchids are capable of photosynthesizing through their roots. This allows them to generate energy and continue to develop even when their leaves are yellowing and dying.
The likelihood of your orchid reviving can be increased by using clear plastic pots rather than decorative ones since they allow light to reach the roots for photosynthesis even in the absence of healthy, functional leaves.
If you give the orchid the right conditions, you should eventually see some new leaves beginning to form from the base of the plant and new roots emerging over the next few weeks. The amount of time it takes to revive varies depending on how severely the orchid was affected and how many roots were removed.
If you need a visual reference and this handy YouTube video, watch it:
Orchid Leaves Yellow or Brown Because of Sunburn
- Symptoms. Orchid leaves that appear burnt are turning yellow or brown. Stress can also cause blooms and leaves to drop off.
- Causes. Orchids can burn in full sun or very bright sunlight, therefore they need filtered light or bright, indirect light.
Most orchids are epiphytes, which means they grow on other trees in their natural habitat. As a result, they are naturally adapted to growing in shadow away from full sun but yet in pretty bright light.
In order to mimic the conditions of their natural environment, you should always plant orchids in an area of bright, indirect light or even some filtered morning light rather than the full sun. This is because orchid leaves tend to be sensitive to the effects of direct sunlight.
The leaves of the orchid may scorch and turn yellow or brown, depending on how much they were burned by the sun.
The symptoms of drought stress can also be brought on by excessively bright light, which can contribute to the orchid drying out too quickly from both the leaves and the potting soil.
The leaves frequently lose their color, die back, and fall off. Although individual sun-damaged leaves are typically not recoverable, the orchid can still survive by producing new leaves.
How to Revive Orchids With Sun Burnt Yellow Leaves
- Put your orchid in a spot with strong, indirect light to ease the plant’s stress and stop further harm. It is crucial to recreate these conditions while choosing a location for your orchids because they are suited to the shadow of the canopy.
- Allow any seriously damaged leaves to naturally dry out and fall off. Sunburned leaves ultimately dry up and wither, but if they are removed too soon, the plant may suffer damage.
- Repot your orchid ideally into a clear plastic container. Because their roots are able to photosynthesize and supply the plant with energy, orchids are common in the plant kingdom. Of course, this is not their primary purpose, but keeping orchids in clear pots allows the plant’s roots to receive light, which is essential for the plant’s recovery and the development of new leaves.
- With proper care (adequate watering and making sure orchids are kept in the proper temperature range), the orchid should ultimately begin to sprout new leaves, which are frequently extremely little.
When their leaves are burned, orchids can take a long time to recover since the leaves frequently fall off (which lowers the orchid’s capacity to create energy) and it takes the orchid some time to grow new leaves. But with a little perseverance, orchids can eventually recover and bloom once more.
Orchids Dying From Drought (Drooping Leaves)
- Symptoms. The roots start to look shriveled, white, and wither. In addition to losing their shape and feeling floppy rather than firm, leaves droop downward. Due to drought stress, leaves might also turn yellow and blooms can wither. The orchid’s stem can also turn brown and wither.
- Causes. orchids aren’t given enough water, it’s given to them too gently, it’s too hot, the humidity is low, and it’s too sunny.
Due to their affinity for adequate drainage and aerated, porous potting materials, orchids are typically more susceptible to overwatering than underwatering.
However, orchids can still experience drought stress if they are not watered frequently enough, are watered too lightly, or are grown in hot, low-humidity climates where the leaves lose moisture and the potting soil dries out too quickly for the roots to absorb moisture.
Depending on the temperature, orchids typically need to be watered thoroughly once every 7 to 14 days so that any surplus water drains out of the drainage holes in the base and reaches the roots.
Only the top inch or two of the medium medium becomes moist if the orchid is watered too little, and the roots are unable to obtain the water they need.
The first indication that an orchid is drought-stressed is when the leaves begin to droop. Even the leaves can become yellow under extreme drought stress, and the roots can shrivel up, turn white, thin, and papery, and eventually die back.
The orchid’s ability to transfer water and nutrients around the plant will be compromised if portions of the roots shrivel and die, which will cause the leaves to become yellow and possibly even cause the leaves and flowers to fall off.
To alleviate stress while the orchid heals, keep it out of direct sunlight and between 55°F (12°C) and 75°F (23°C) in temperature if some of its roots are still alive. This will help the orchid recover from drought.
How to Revive a Drooping Orchid
Cutting back can help encourage the formation of new, healthy roots. It can also be helpful to remove dead, white, papery roots because they do not regenerate. Cut the stems (or flower spikes) back to the base using a pair of scissors or pruners to encourage new growth if they start to turn brown.
The orchid can eventually bloom again with regular watering, misted leaves for greater humidity, and placement in bright, indirect light at the appropriate temperature. Over the next several weeks, the orchid should start to show signs of recovery.
Too Much Fertilizer can Burn Orchid Roots
- Symptoms. The roots can turn brown or black, the leaves become floppy, and the orchid may produce no flowers at all or few blossoms. The leaves can occasionally turn yellow.
- Causes. For orchids, regular houseplant fertilizer is too potent. Apply fertilizer too frequently or in excess. The leaves of orchids can become yellow if salt buildup from fertilizer prevents the roots from uptaking water.
Orchids do not necessarily need a lot of fertilizer because they are suited to growing with their roots exposed on other trees or in loose soil.
However, some feeding is required to sustain healthy development and can promote flowering, but it’s crucial to use fertilizer designed specifically for orchids.
All the nutrients an orchid needs are present in an orchid fertilizer that has been specially prepared to assist healthy growth and encourage flowering.
If an orchid receives too much fertilizer, the leaves may become floppy and fail to bloom. Additionally, the roots may burn, which would prevent the orchid from growing properly and lead it to wither away.
How to Revive an Orchid with Burned Roots
- Reduce the amount of fertilizer you use, put the orchids in a basin, and spend the first ten minutes washing the roots under the faucet. After using too much fertilizer, the soil may build salts, which this vigorous watering helps to remove. Allow the drainage holes to dry out and the top inch of the potting medium to dry.
- Take the orchid out of its containers and look at any roots once the excess salts have been dissolved under the running water and the top inch of the potting material has dried. When the orchids are healthy, the roots should be green or light gray and feel solid and full.
- If the roots look brown or black, you should cut them back to the plant’s base because they are no longer capable of carrying out their intended role.
- Repotting your orchid into a new potting media that contains pine bark or specialized orchid potting mixes is great since it will reduce the effects of too much fertilizer. Avoid using sphagnum moss because it retains too much moisture.
- Any yellow leaves will likely become brown, die off, and fall off the plant. The orchid may be harmed if you make an effort to forcefully remove these leaves.
- If you take careful care of your orchid, it should begin to recover over the next several months, perhaps with the emergence of new leaves or the replacement of damaged roots with new ones.
I would stress the significance of feeding orchids using a fertilizer made specifically for them, which is available through garden centers and on Amazon.
The roots of orchids are far too delicate for regular fertilizer, and their natural growing conditions are somewhat odd (they prefer to grow on trees and frequently get their nutrients from nearby rainwater or water vapor).
Always adhere to the manufacturer’s recommendations while using special orchid fertilizer to ensure healthy orchid development and encourage flowering.
Orchid Flowers and Flower Buds Falling Off
- Symptoms. abrupt flower buds or orchid blooms falling off.
- Causes. The orchid is under stress for a number of reasons, including a change in humidity or temperature. The buds may fall off in either low light or full sun. stress brought on by overwatering or dehydration.
When orchid blossoms or flower buds start to fall off, it’s usually a sign that the environment it’s grown in isn’t conducive to the conditions that orchids are evolved to.
Whenever there is a major difference in temperature or humidity, orchid blossoms abruptly fall off. Stress is a common cause of flowers and buds falling off of your orchid, and it occurs most frequently when temperatures are lower than 55°F (12°C) or higher than 75°F (23°C).
Because orchids enjoy a humid environment, they may lose blossoms as a result of stress if the humidity fluctuates. Air conditioning, draughts, and interior heating can all produce fluctuations in humidity.
Flowers and buds also fall off orchids that have been underwatered or given too little water, which is an adaptation meant to conserve resources.
Overwatering can result in a number of symptoms in orchids, including the loss of blooms and buds as well as the withering and dying back of leaves.
How to Revive Orchids with Flowers Dropping Off
- There isn’t much you can do once the flowers or flower buds have come off other than to alleviate the environmental stress that initially caused the flowers to fall off.
- Make sure the orchid is in a space that is between 55°F (12°C) to 75°F (23°C) in temperature. Even within their optimal temperature range, orchids can be sensitive to temperature changes, so strive to maintain a steady temperature. Keep your orchid away from drafts caused by open windows, direct air conditioning currents, and radiators or other sources of heat.
- Comparatively speaking to the orchids’ natural habitat, the air in homes typically has far lower humidity levels. To produce a humid microclimate that resembles the circumstances of the orchids’ natural environment, raise the humidity by sprinkling the leaves. If your area has low humidity, spray your orchids once every two days. Since bathrooms and kitchens tend to be the most humid rooms in homes, placing orchids there can also be beneficial.
- Try to place your orchid somewhere in the house where it is bright but not in direct sunlight to encourage blossoming. The orchid’s plant does not have as much energy to develop blossoms when it is in a rather dark environment.
- Compared to other indoor plants, orchids require less frequent watering, but they shouldn’t be allowed to entirely dry up. In order to guarantee the orchid receives enough water and prevent overwatering risks such root rot, the top inch of the potting material should be allowed to dry between bouts of watering.
- To guarantee that the orchid obtains all the nutrients at the appropriate concentration to stimulate flowering, use a special orchid fertilizer as directed by the manufacturer. Applying regular plant fertilizer could destroy the orchid, therefore avoid doing so.
If the correct circumstances are present, orchids should be able to hold onto their flowers and flower buds and rebloom, typically in the Spring, Fall, or Winter.
(Read why my orchid blossoms and flower buds are dropping off in my article.)
Orchid Dying After Repotting
- transfusion shock Stress can result from orchid transplantation, especially if the roots are damaged or if the orchids are transferred to an area with a contrast in light, temperature, or airflow. After repotting, keep orchids away from draughts and air currents and make sure they are kept in the proper temperature range of between 55°F (12°C) and 75°F (23°C) in bright indirect light.
- transplanting orchids into a potting medium that retains moisture. Pine bark or specially prepared orchid potting mixes work best for orchids because they need aerated potting mediums to thrive. For orchids, sphagnum moss frequently absorbs too much moisture, causing the plant to wither at the root (yellow leaves, wilting appearance, and roots that are turning brow, or black with a mushy texture). Ordinary potting soil has a structure that prevents orchids from living and absorbs too much moisture around the roots.
- Overwatering. Overwatering can be quite damaging to orchids. Never water again until the top inch of the potting medium has dried out.
- – Step 2: Remove the Orchid and Discard Old Media. … Always adhere to the manufacturer’s directions while using special orchid fertilizer to ensure healthy orchid development and encourage flowering.
Key Takeaways:
- Symptoms. abruptly falling off orchid blooms or flower buds.
- Causes. There are many reasons why the orchid gets stressed, including a change in humidity or temperature. The buds may drop because to either low light or direct sunlight. Stress due to overwatering or dehydration.
- If orchid blossoms or flower buds are falling off, this is typically a sign that the conditions in which the orchid is growing are not suitable for it.
- An abrupt change in temperature or humidity causes orchid blossoms to fall off. Stress is a common cause of flowers and buds falling off of your orchid at temperatures lower than 55°F (12°C) or greater than 75°F (23°C).
- The orchid may lose blossoms as a result of stress if the humidity levels fluctuate because they like a relatively damp environment. Indoor heating, drafts, and air conditioning can all result in fluctuations in humidity.
- As a survival tactic to save resources, underwatering or overwatering orchids results in the loss of blooms and buds as well.
- Overwatering can result in a variety of symptoms in orchids, including the dropping off of flowers and buds and the regrowth of leaves.
FAQ
How do you rejuvenate an orchid plant?
After the flowers or flower buds have fallen off, there isn’t much you can do but address the environmental stressors that led to the flowers’ first drop.
How do you revive an indoor orchid?
Ascertain that the orchid is in a space that is between 55°F (12°C) and 75°F (23°C) in temperature. Try to maintain the temperature fairly constant because orchids can be sensitive to temperature changes, even when they are kept in their optimal temperature range. Away from direct air conditioning current, radiators, and other heat sources. Keep your orchid away from drafts from open windows.
Can you regrow an orchid after it dies?
Comparatively to the orchids’ natural habitat, the air in homes typically has substantially lower humidity levels. Misting the leaves will increase the humidity, simulating the humid microclimate found in the orchids’ natural habitat. If you live in a climate with little humidity, spray your orchids once every two days. Being the most humid parts of the house, placing orchids in bathrooms or kitchens might also be beneficial.
What do you do with an orchid after the blooms fall off?
Locate your orchid somewhere in the house that receives bright, indirect light but avoid direct sunlight as this will aid to stimulate flowering. The orchid plant doesn’t have the energy to create blossoms to the same amount if it is in a relatively dark environment.
Why is my indoor orchid plant dying?
Conversely, they shouldn’t be allowed to entirely dry out. Orchids require less frequent watering than the majority of house plants. In order to guarantee that the orchid receives enough water and prevent overwatering risks such root rot, the top inch of the potting soil should be allowed to dry between bouts of watering.