When an orchid is overwatered, the roots rot and turn brown with a rotting texture and an unpleasant smell; in contrast, when an orchid is underwatered, the roots get smaller and have a shriveled, gray appearance.
The most popular type of houseplant orchid, the moth “phalaenopsis,” stores moisture in its leaves and roots. When the orchid is submerged, it draws on these reserves, causing the roots to shrink and the leaves to wrinkle.
The fundamental distinctions between overgrown and underwatered orchids are listed in the following reference table:
| a healthy-looking orchid | Orchid overwatering signs include: | Symptoms of an underwatered orchid |
| Healthy orchids have roots that are initially green and gradually turn a light gray color between waterings. The roots ought to feel strong and full. | Overwatered roots develop a mushy texture, a rotting appearance, and an unpleasant odor. The roots eventually wither and become papery and hollow. | Roots: While underwatered orchid roots begin to look shriveled and turn gray, they do not smell bad. Significantly submerged roots die back and become papery and hollow. |
| Leaves: Rather than being horizontal or drooping, the leaves should be plump, solid, dark green, and upright. | Overwatered leaves droop, turn yellow, and frequently have brown spots, which is a sign of a fungus infection. | Initially appearing wrinkled, underwatered leaves soon wilt and turn yellow. |
| If the conditions are right, orchids can bloom at any time of the year, but they typically flower more in the spring and summer. | Flowers and flower buds: Stress causes overwatered orchids to lose their flowers early. | Flowers and flower buds: Drought causes the early loss of flowers on orchids that have been submerged. |
The growth of an orchid is significantly slowed down if it is underwatered, but it stops and degrades more quickly if it is overwatered, which leads to root rot.
Overwatered orchids are far more difficult to resuscitate than underwater orchids.
Continue reading to learn how to fix your orchid and prevent it from being overwatered or overgrown.
Table of Contents
How to Tell if an Orchid is Overwatered
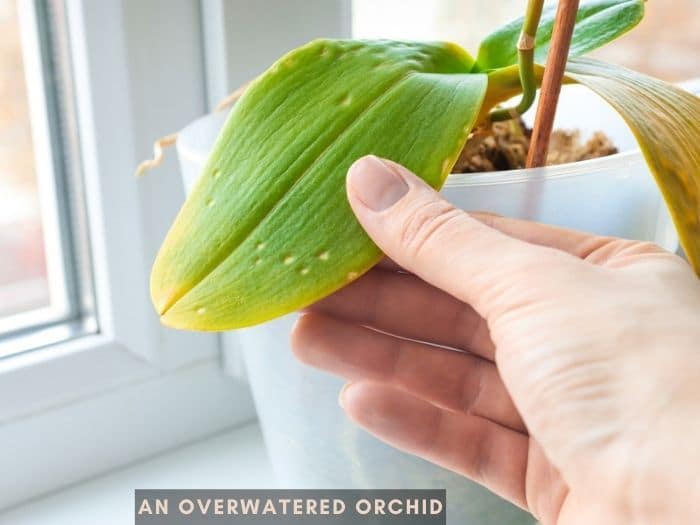
The following are signs of an overwatered orchid: brown, squishy, and mushy roots; yellowing and browning of the leaves; and a wilted appearance. Consistent overwatering causes the roots to change from brown and mushy to papery white, indicating that the roots have died back. Additionally, the buds and flowers could detach.
The signs of both overwatering and underwatering in orchids often resemble one another, therefore the best approach to determine which condition your orchid is in is to examine the roots and feel the potting soil.
Because they are epiphytes that grow on trees in their original tropical environment, moth orchids, the most popular houseplant orchid, need extremely well-draining, humid conditions.
Healthy orchid roots have a green or light grey appearance, feel firm, and are odorless.
In overwatered or soggy soil, orchid roots can become infected with fungal infections and root rot, which causes the roots to become soft and brown with a rotten appearance.
The roots get shriveled and turn a papery, gray-white color as they decay and die back, indicating that the root is dead.
The orchid’s leaves will yellow and droop and look to be dead if the roots are withering because they will be unable to absorb water and nutrients to transfer them to the flowers, stalks, and leaves.
Overwatering frequently causes the leaves to become yellow with brown blotches, which typically denotes a fungal condition.
Also more prone to fall off are the flowers if a sizable portion of the roots are dead.
Only water orchids after allowing the potting medium to somewhat dry up. This typically means that orchids only need to be watered once every seven days.
You are overwatering your orchid if you are watering it more frequently than every seven days and the potting soil is always damp.
It is crucial to emphasize that the orchid’s demise might not just be due to overwatering.
A solid drainage system must go hand in hand with an appropriate watering plan. Moth orchids must be planted in a specific potting mixture made of pine bark for orchids.
By allowing water to drain readily after watering and air to flow around the roots, this mimics the typical drainage conditions of the orchids’ natural habitat.
The issue is that as organic potting materials deteriorate over time, the pine bark fragments convert into compost, which traps too much moisture and limits airflow around the roots of the orchid, causing it to become overwatered and eventually die.
In order to prevent the effects of overwatering, it’s also crucial to grow orchids in containers with many of drainage holes in the base and to frequently dump any saucers and trays that may have collected there.
How to Fix Overwatered Orchids
- Water your orchids no more frequently than once every seven days. Between each watering, the potting media should slowly evaporate. Give the orchid a good soak after the top inch of the potting medium feels dry. This soak-and-dry cycle of watering mimics the conditions in the orchid’s natural habitat and satisfies its water needs without running the risk of the fungal illness root rot.
- Examine the roots of the orchid by removing it from the pot. When roots have finished receiving water, they should be somewhat gray but still feel hard. However, they are now green. With a sterile pair of pruners, cut the roots back to healthy growth or to the plant’s base if they are brown, rotting-smelling, and obvious. To avoid the risk of transmitting fungi from healthful roots to diseased, rotting ones, wipe the blades with a towel dipped in disinfectant between each snip.
- Repot the orchid in a potting mixture specifically made for orchids. The finest potting mediums for moth orchids are those based on pine bark because they generate a porous, well-draining soil structure that allows any excess water to readily drain away while yet absorbing enough moisture from the roots of the orchids. If the roots are rotting, it is critical to change the potting soil.
- After repotting, mist the orchid’s leaves, stem, and roots often. Because orchids are native to tropical conditions, soaking the leaves after repotting helps enhance humidity and lessen stress on the plant.
- Every two to three years, repot your orchid to reduce the effects of overwatering. The symptoms of an overwatered orchid are caused by the decomposition of orchid potting mixes, which makes the potting medium more compact and increases moisture retention while reducing the amount of oxygen near the roots. When the orchid is at its most resilient, repot it in fresh potting soil in the spring.
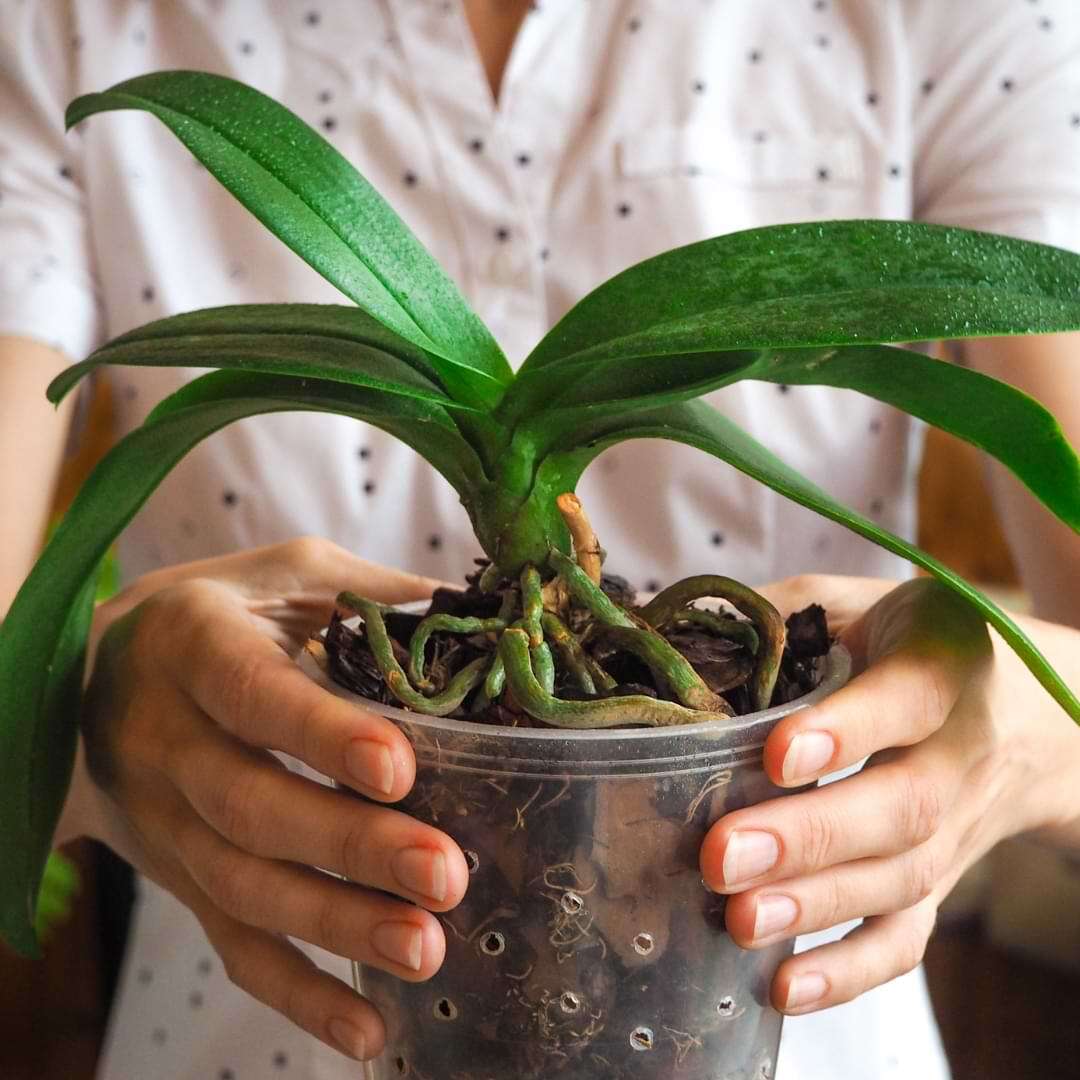
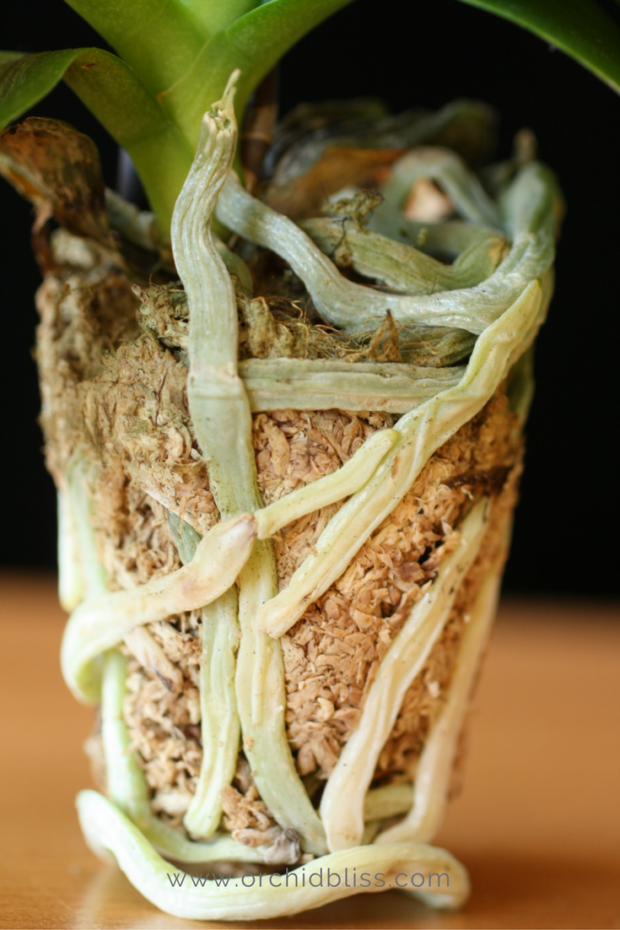
- Planting your orchid in a clear plastic container with several holes on the base and side of the container is ideal. You can see the roots in clear plastic containers, so you can determine whether they appear overwatered or underwatered and whether they are healthy (green to light gray with a firm texture and plump appearance). To keep the roots healthy, the pot’s side holes help with air circulation. The plastic pot can then be inserted within a larger, more beautiful outer pot.
- Avoid allowing trays, saucers, and outside pots to collect water at the bottom of the plant after watering. To prevent root rot from excessive watering, remove everything from the area under the orchid’s pot.
Yellow leaves are likely to die back and fall off on their own, so avoid removing them. Removing them while the leaf is still connected could put further stress on the orchid, which is already suffering from overwatering.
Another advantage of transparent plastic pots is that they might help save the overwatered orchid. Moth orchids are quite uncommon in that their roots can also photosynthesize, which is normally done by leaves and gives the plant energy from sunshine. (Read my post on selecting the best orchid pots.)
Overwatering can make leaves become yellow and wither, which prevents them from photosynthesis.
The orchid’s overwatered roots in their transparent plastic pot can receive enough light and energy for new, green leaves to sprout, saving the plant.
(Read how to water orchids in my article.)
How to Tell if an Orchid is Underwatered
An orchid that has been submerged in water will have stunted development and wilting-looking leaves. The blossoms and flower buds wither or never open. The roots of the orchids thin out and become papery and white.
The signs of an overwatered and underwatered orchid share many similarities because both can result in the leaves turning yellow and wilting, as well as the buds and blooms dropping off.
The roots of an underwatered orchid shrivel up and become papery, but they do not turn brown or feel mushy or rotting, which is the main distinction between an underwatered and an overwatered orchid.
The only causes of brown, decaying roots are excessive irrigation and insufficient drainage.
Therefore, if the roots of your orchid have changed from looking plump and firm to looking shriveled but have not yet started to rot, turn brown, or smell bad, it is likely that it has become submerged.
When properly watered, orchids should feel solid because their roots hold moisture.
The first indicator of an underwatered orchid is typically the presence of shriveling, gray roots because an underwatered orchid uses all the moisture reserves in the roots, causing them to dry up.
Water orchids when the potting soil seems just a little bit dry. Your orchid is clearly underwatered if the potting soil totally dries up in between waterings.
Even if an orchid receives the recommended amount of water (around once every seven days), underwatering can still occur.
A thorough soak of water should be given to orchids to ensure that the potting medium is evenly saturated.
If the orchid is watered too sparingly, only the top inch or so of its potting soil becomes damp, preventing the roots from accessing the moisture they need, leading to an orchid that is underwatered and has shrunken roots.
Underwatering may be made worse by additional elements like:
- minimal humidity (orchids need high humidity and should be misted or placed in a humid room, such as the bathroom).
- – Step 2: Remove the Orchid and Discard Old Media. … Planting an orchid is best done in a clear plastic container with several holes drilled into the container’s base and side. You can see the roots since clear plastic pots make them visible. This allows you to determine whether the roots appear to be overwatered or underwatered and to determine whether they are healthy (green to light gray with a firm texture and plump appearance). In order to maintain the roots healthy, the pot’s side holes also aid in air circulation. The plastic pot can then be placed within a bigger, exterior ornamental pot.
- Avoid letting outer pots, trays, or saucers collect water at the bottom of the plant after watering. To prevent overwatering-induced root rot, remove everything from beneath the orchid’s pot.
How to Fix and Underwatered Orchid
- Another advantage for rescuing the overwatered orchid is the use of transparent plastic pots. Moth orchids are quite uncommon in that their roots can also photosynthesize, which is normally done by leaves and gives the plant energy through sunshine. (Read my piece on selecting the best pots for orchids.)
- Leaves can no longer photosynthesize when they are overwatered, which can cause them to turn yellow and die back.
- It is possible to preserve the overwatered orchid by allowing new, green leaves to sprout since the orchid’s roots in their clear plastic pot can receive enough light and energy.
- To learn how to water orchids, see my post.
- The growth is stunted, the leaves begin to wrinkle, and the orchid appears to be wilting, which are signs that it has been submerged. Flowers and flower buds wither or fail to open at all. The roots of the orchids become papery and white as they shrivel.
- The signs of both an overwatered and an underwatered orchid share many similarities, including yellowing and wilting leaves, falling off buds and blooms, and leaf wilting.
However, the main distinction between an underwatered and overwatered orchid is that the roots of an underwatered orchid shrivel up and become papery rather than turning brown or feeling mushy or rotting.
Insufficient drainage and overwatering are the only causes of brown, decaying roots.
As a result, if the roots of your orchid have changed from being plump and firm to being shrunken and do not exhibit any signs of rotting, turning brown, or smelling bad, then it is submerged.
If properly hydrated, orchids should feel solid due to the moisture that their roots store.
Shriveling, gray roots are typically the first indicator of an underwatered orchid because an orchid that has been submerged uses up the moisture reserves in the roots, causing them to shrivel.
Key Takeaways:
- When the potting soil is just starting to feel dry, water your orchids. Your orchid is clearly underwatered if the potting soil dries out entirely in between watering sessions.
- If an orchid is watered too little, it can still experience underwatering even when watered at the recommended frequency (about every 7 days).
- The potting media should be evenly moistened by giving orchids a fair soak of water.